Followers

About Me

My photo
I wargame in 20mm, primarily using Command Decision 3, but have been tempted into other systems. I have a tendency to adapt CD to suit other periods with varied results! I take awful pictures and am at best an average modeller and painter, but hopefully quantity will have a quality all of its own.

Wednesday, 10 February 2016

Old School Airfix Conversions

I have rather neglected the blog of late, and I do have a few AARs to post, plus some other items too. But firstly since I played a game of Volley and Bayonet on the weekend, and have started doing more Napoleonic figures, I should post this first...

At the end of last year I acquired a number of second hand painted Airfix figures from Glenn. amongst these figures were a number of conversions that have managed to survive a number of years neglect after having  a reasonable amount of effort and imagination into converting them.

Mounted figures are from the Airfix Cuirassiers set, and the horses from the Airfix US Cavalry set
 The first of these conversions, I have after hitting the books and discussing it with Ion (Archduke Piccolo) are most likely a conversion of figures from the venerable Airfix  Waterloo French Cavalry set (click here for the PSR review) and horses from the even more venerable Airfix US Cavalry set (click here for the PSR view). I hope to get these fellows refurbished soon as I think they have a certain charm!

An Airfix Russian Dragoon? EDIT: Austrian Cheveux Leger. Thanks Doug!
A more basic headgear conversion is these rather nice (but in need of refurbishment) French Hussars. the base set is of course the Airfix Waterloo British Cavalry (Hussars) set (click here for the PSR review), with the headgear being the shako from the Airfix Waterloo French Infantry set (click here for the PSR review).

Airfix French Hussars.

The drummer is very cool figure, but alas would be in the rear with the gear.
Again, since I don't currently have any Hussars in my French hordes for Volley and Bayonet, these should get refurbished sooner rather than later.

Airfix US Cavary horse and figures with head swaps.
The above fellows are a little more challenging as they are Airfix US Cavalry horse with the figures having heads from the Airfix Waterloo French Imperial Guard (click here for the PSR review). I believe that could either be pre1810 Carabiniers, or more likely French Horse Grenadiers - which given I think the paint job represents the cuirassier habit-vest - suitable for the Waterloo campaign.

Airfix US Cavalry converted into Polish Lancers.
The final lot is a group of Airfix US Cavalry that I believe have been converted into Polish Lancers, by means of carving the headgear into something more Polish.

Some assembly required.
The czapskas are a good effort, but aren't quite there. With a little bit more effort I could improve on them, but I am tempted to leave it as is and perhaps see if I could retask them as something a little more 18th century as the czapska seems a little more squat in some of the pictures I've seen.
Sunday, 13 December 2015

Of Ersatz and 3D-Printed NZLAVs

A while back I made a post about the S&S models NZLAV (click here to see that post). While a very nice kit, it has a major disadvantages of price and postage costs. This means that to represent a typical squadron of LAVs on a one to one basis I would require a minimum of 16 NZLAVs.

Left to Right: S&S NZLAV, Ersatz NZLAV, and a Maisto LAV-25.

To do this with the excellent S&S Models kit would work out at around over NZ$450, not including postage for them from the UK to NZ. Given this I needed to find another solution. The most logical and immediate solution was to get 3D printed vehicles.

This option was pursued but would ultimately take significantly longer than expected to produce results due to a number of false starts.

Left to Right: 2x  Maisto LAV-25s, (the middle one is starting the conversion process towards becoming a Ersatz NZLAV), and  a Bravo Team  Stryker.
So I started to see if I could produce the required vehicles by converting diecast Maisto L-25s into NZLAVs. The first challenge was trying to source enough vehicles to do this. My source of vehicles was The Warehouse ( A large nationwide chain of big box stores in NZ that sold them for around NZ$8-$10 each), but each branch only carried a very small number of the LAV-25s. Fortunately I was ably assisted by family and friends in tracking these down, in particular by Will who tracked down a large number in various stores throughout Auckland and then mailed them down to me.

The large plastic gun barrel is replaced by a metal pin.
The process of getting all these diecasts together for conversion took time, so I had to find an immediate substitute, which I found in the form of 1/72 Strykers, a number of which were provided by Kirk. I am going to continue work on the conversions, as this will mean that I will have another squadron of LAVs available.

From Left to Right: Freshly printed NZLAV, assembled and unpainted, and final painted model.
Despite the problems with making ersatz NZLAVs, and having the  Strykers available, I continued to pursue getting 3D printed NZLAVs, and finally I managed to get some produced.

3D Printed NZLAVs and the S&S model NZLAV
The biggest hurdle with the printed models is to remove them from the cocoon of plastic that they are printed in. This is a very time consuming process, but certainly less than the 4 hours it takes to print a NZLAV hull. 

S&S NZLAV is flanked by two 3D printed models.
The plastic used is the same type as used in Lego, so it will put up with a great deal for handling. It also takes paint well.

3D printed NZLAVs and a Javelin team from Wartime Miniatures.
I have added some extra details, such as coils of wire and jerry cans to the models, and am going to add spare wheels to some of them as well. I might even add a light obstacle blade, and I am toying with the idea of painted one up in a MERDEC scheme - such Paul at Plastic Warriors has done here.

Monday, 7 December 2015

Offensive Support

This weekend I finished off some projects that had been on the back burner for the last couple of months. The first project was finishing off a pair of scratch-built US 4.2" mortars for Mr K. I used some mortar parts from a Battlefront M-113 sprue and some Esci sand bags to quickly bodge up something that roughly looks the part. I then neglected to paint them for around three months!

Foreground: US 4.2" Mortars. Background: 81mm Mortars.

The same as the picture above.
 The three 81mm Mortar teams are to go with the support weapons in my previous post. They are Pegasus WW2 Germans that has been crudely modified using a scalpel and liquid green stuff, and then given a rough paint conversion.

Crude but possibly effective.
Since there has been a trend towards having heavier mortars, I also converted some of the Pegasus WW2 German  120mm mortars and crew using the same methods.

120mm Mortars. A useful piece of indirect fire support.
The last piece of offensive support I finished off were four more 105mm Light Guns. Three of these are intended to replace the scratch built guns I made here. The forth gun will also replace one that had the barrel at a high angle and has been broken and repaired a couple of times this year.

105mm guns, made from the Airfix/JB Models kit.

A different view of the above.
 So all in all, a rather nice collection of offensive support elements!

A collection of mortars.

Wednesday, 2 December 2015

Support Weapons

It has been a while since I've made a post in the blog, but I haven't been idle! Here are some pictures of some figures I have recently finished painting.

The whole bunch.

GPMGs. Mix of Revell Modern British and Esci Modern Americans.

The .50cal is a Caesar Modern American, while the HMG and crew are Elhiem Modern Americans. 

 GMG and crew are Elhiem Modern Americans.

Javelin teams are Modern Australians from Wartime Miniatures.
In painting these I have made the deliberate decision not to attempt the multicam of the current NZ Army uniform, as previous efforts have once a wash has been applied become rather indistinct at at distance. The figures seem to pass muster without the extra detail so I am rather happy with the overall result.

Friday, 4 September 2015

Of Washes and Varnishes

 Over the last couple of years I have become a fan of using washes to pop the detail in figures and models, and make my efforts at painting just look better.

Washed and unwashed.
 My wash of choice has been the various recent iterations of GW brown wash. However, for projects that require lots of wash, this can be rather expensive.

After and before......

I had heard that using the Army Painter dip system could be cheaper - however it is rather thin on the ground in the wilds of my current locale. I had heard that a similar effect could be achieved by using a much cheaper product, but my research initially led only to products that weren't available in NZ.


Spot the difference. Models are all 1/72 Bravo Team M-3A2 Bradleys.
But a chance conversation with an Australian came up with the fact that some modelers over there were using a product available there in local hardware stores as a substitute for the Army Painter dip.

The answer - available for around NZ$20 at Mitre 10.
This refocused my efforts on rather than looking for a particular product, I should hunt for a type of product - a polyurethane stain and varnish - and experiment with that. The methodology was brutally simple paint it on straight out the can (Note: It is a little like molasses, so do a test vehicle first)

The results (so far) on around a dozen tanks, three dozen APCs, and about half a dozen buildings, have been positive. On figures - less so. But I have another experiment planned for that.....


Wednesday, 2 September 2015

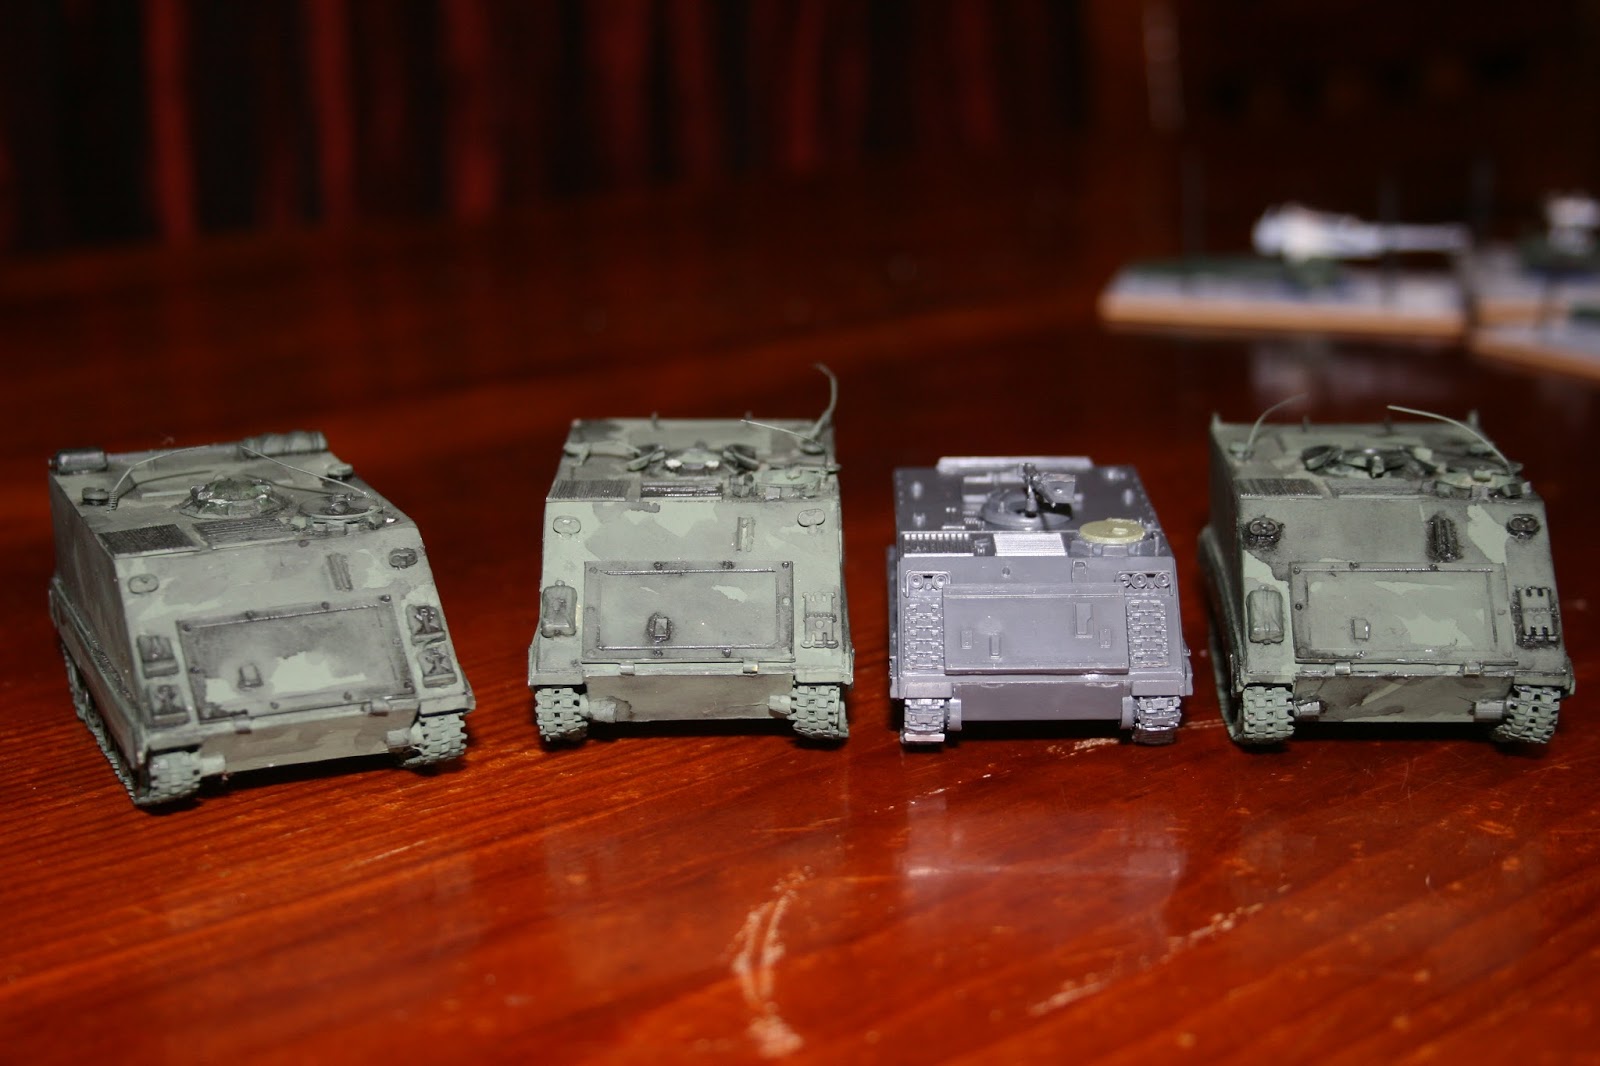
Making M-113s Part One

I've been quite busy making a variety of bits of pieces of late, but have been rather slack in actually posting anything. A while back, I started work on some cardboard M-113s  (click here if you want to know more)

A mixture of Bravo Team ready mades (at rear), Esci (unpainted front left), and cardboard model M-113s

The Esci kit was missing a few key pieces that I replaced using the usual methods of bodging out of plastic card, or finding something about right in the bits box.


One of those road wheels is not like the others.....
A wheel and tire from a jeep or light truck is given a outer ring of plastic card in order to make a new road wheel.

The green hatch is a spare from the Airfix M-113 Fire Support Vehicle kit.
I still have three more of the Esci kits to build, and I plan to build them as the straight APC version without any additional stowage. With the cardboard models, I have tried to add clutter and stowage to the vehicles in order to try and disguise any shortcomings in the models, and to see if I could pass them off as vehicles used by support elements, rather than teeth elements, while still maintaining flexibility to use them as such as needed.


Esci vs. Cardboard.

I don't think I have really succeeded in doing this - at best I have made three M-113s that have a certain air of clutter to them. I suspect I need to put more stowage on them, and/or items of auxiliary equipment that will earmark the vehicle into a support role.


Needs more stowage.....
And the tracks aren't quite right....
I could have put more effort into the rear doors, but I figured this was good enough...


On the cardboard front I have benefited from the generosity of Paul from Plastic Warriors sending me three rather nice scratch-built APCs (click here for details)


Esci vs Cardboard part II.
Now for my purposes, these M-113s from Paul being a little large is not a problem, as an imagination background allows for the creation of plausible back stories that can explain away a number of sins.

The fact that there existed earlier APCs, such as the M-75 and the M-44 (click here for details). that were somewhat larger than the M-113, makes it easier to declare these to be a hitherto unknown vehicle of a similar ilk.

Spot the Esci!
That, or field them in force with no other M-113s!

Sunday, 9 August 2015

Bergstiger to Gun Tiger

Another partwork magazine I have been collecting is Military Vehicles magazine (Which is rather a plain name, but quite descriptive of the contents). Issue three of the magazine (of which I bought some additional copies) offered a model M1126 Stryker and a model Bergetiger.


And all for under NZ$15 an issue.
Now, while having multiple model Strykers is very useful, having multiple models of a vehicle that most likely only one ever existed of, is somewhat less useful.

Tank and spare parts.
Fortunately, I had spare parts from one of the many different Tiger I kits put out by Hasegawa, and thus I had a solution for one of the extra Bergetigers. (One of the others I sent over to Paul at Plastic Warriors click here to see his post on it).

Useful spares.
The first step was to remove the crane and winch, which according to some (click here for more detail) is too small to use as a recovery vehicle, but was actually designed for use as a demolition charge layer. Other theories are discussed here.

And all gunned up.
I have of course kept one for use as a demolitions tank, or workshop tractor, or even an ARV!