Saturday 28 April 2012

Thye battle of St Domino's Monastery Pt. I.


 Recently played a game of CD3 with a friend of mine, Mr K. the game was to be set in Italy in 1944, and was to be a small battle between a battalion of US infantry, and a battalion of RSI infantry. As the game progressed, each side would have access to small company sized groups of reinforcements. These reinforcements would take 1 to 3 turns to arrive (1d6, 1,2 = 1 turn, 3,4 = 2 turns, 5,6 = 3 turns.) This process would start with the first Axis encounter with the US forces, happen again when US forces encounter the Axis reinforcements, and so forth. we decided to do it this way because we wanted to try it out as a mechanism for feeding in new units into a game.

The kitchen table awaits....


We decided on a small setup of some roads, a woods, and a BUA consisting of the ruins of St Domino's Monastery. the Italian forces would be defending the area for a possible Allied advance.

Another view, this time towards the fridge.
The Italian forces consisted of a battalion of infantry, minus it's support company. The TOE was:

RSI Infantry Battalion - Troop Quality: Regular,  Morale: 7.
 HQ Company w/
  1 Command stand
  2 Support stands

3 Infantry Companies, each w/
   3 Infantry stands

The above TOE was based on the 1943 Italian Infantry battion TOE given in 'Armies of the Second World War' - note that the troop quality has increased one grade, and the morale has increased one point. My justification for this was  twofold, firstly for game balance, and secondly to reflect that, initially at least, RSI troops had 'better' morale and training under the German reorganization of Italian forces. With their usage as primarily anti partisan and garrison troops, morale did drop, and desertion did increase, so I would be reluctant to give those ratings across the board in 1944 - but for one small unit in a fictional battle, I am happy to do so.

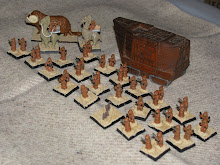
Esci Italian pack Mules... surely you mean, Esci Italian Support Stands.

The first company deploys along the treeline.

Same company as above, but a different view. The Italian figures are all Esci, purchased second hand based up for WRG. They were then rebased for CD. The uniform colour is the same green shown on the old Esci box art, and is far too green - it should be more grey green. When these figures are repainted, when additional Italian forces are painted up, this mistake will be corrected.

The other two companies deploy in the Monastery.
 The US forces consisted of a full US Infantry Battalion, minus most of its motor transport, and having its 57mm gun replaced with an additional bazooka stand. As Mr K had never used these particular troops of these before (normally he uses US airborne troops), he elected to have them be troop quality regular.
His TOE was:

1944 US Infantry Battalion - Troop Quality: Regular, Morale: 8

Headquarters, w/

   1 Command stand
   1 Jeep

Headquarters Company w/

    1 Command stand
    1 Jeep
    2 Bazooka stands

3 Rifle Companies, w/

   1 Command stand
   1 Weapons stand
   3 Infantry stands

Heavy Weapons Company, w/

   1 Command stand
   1 Jeep
   1 81mm Mortar stand
   2 MMG stands

So to begin with, my forces were outnumbered, but I had two major advantages; firstly that I was defending, and secondly, that I would be receiving the first reinforcements.

US Heavy weapons Company started the game across from my deployment in the woods.

More US Infantry ready to advance.

US infantry ready to advance into the woods.
MR K deployed his troops and the game began with two US companies heading into the woods. These two companies were met with a hail of bullets from the Italian company in the woods. First blood to me.

Hit, forced back, and pinned!

And some more of the same!
Having temporarily blunted the US advance on one flank, I bravely decided to disengage back further into the woods. things for the brave Italian infantry company were about to get worse.....

Thursday 26 April 2012

Sherman Firefly

 Most of this post is my musing on paint schemes. It's not an exciting topic, but I just wanted to record my thoughts somewhere that I would find difficult to lose, and could receive feedback on.  I have had discussions with Archduke Piccolo, and Ken, on this topic which have also shaped my musings. I've looked at TMP for info, and checked out Mike Starmer's thoughts on the MAFVA site, as well as checking out other sites, and of course looking at books!

As part of the British Tank Refurbishment project, I have been trying to figure out a paint scheme for my late war British and Commonwealth forces in the European Theatre of Operations. What I trying to do is minimise the amount of repainting I have to do, by using a combination of existing paintjobs, finding a simple repaint scheme for unpainted vehicles, and end up with a force that I can field in both Italy and North Western Europe. While I can always add in olive drab vehicles of American origin into a British force, (My understanding is that eventually Olive Drab was recognised as being an 'official' British paint scheme, to save American supplied vehicles from having to be repainted, but at the same time Olive Drab can also refer to a British colour that looks quite different.)
A selection of Matchbox Fireflies.
Same selection, different view.
Please note: I have only painted the last three tanks on the right, the two on the left were painted by other people. Starting from the middle, going left to right, we have a tank sprayed in FOW US Olive Drab, a tank sprayed with FOW late War British Armour, and washed with GW Devan mud, and the final tank in straight FOW Late War British Armour.

The two remaining tanks on the left, the dark one on the extreme left seems to be in a very late war scheme used in Germany by some Guards units ( please correct me if I am wrong - but I have only found one source for this in a colour plate in one of ken's books, and I'm not entirely convinced), while the one second from left is painted in a dark green colour - probably a Humbrol colour- that looks ok, but I'm not totally convinced with, but works well with the tank that has been sprayed with FOW Late War Armour, and then washed. The small numbers of vehicles I have in this colour will blend in well, if I use the spray and wash solution.

Both tanks have been spray painted with FOW Late War British Armour. the one on the left has also been given a wash of Devlan Mud.
Tank on left has been spray painted with FOW Olive Drab. Tank on right sprayed with FOW LWBA.
The two remaining tanks. Left: Dark Grey Green, and Right: Dark Browny Green.
So I am left with the conclusion that in order to get a paint scheme even roughly right for a British/Commonwealth force, I can use the FOW colour, with a wash as the base coat, and then figure out a disruptive colour, if any, from there. Of course, the usual caveats apply, and any mistakes are my own. It also appears that the colour of British tanks is quite a heated issue in some chunks of the internet, maybe it's not that boring a subject after all!

British Tank Reburbishment Pt. 2.

After spraying the tanks with some nice grey primer, it was time to go about adding missing hatches and tracks. Some of the resulting repairs were a little sub optimal due to shortages of parts.
Left track - an original Airfix rubber Sherman track. Right track - a mix of matchbox Firefly track, plastic strapping, and plastic card.

The Airfix track looks good!

The unholy mixture used to create the right track. Still, a coat of paint hides many sins.
While not the best of replacements, it does the job and looks better than the last resort of using plastic strapping to create both tracks. This has been the fate of more than one refurbished tank...
The replacement of missing turrethatches was to prove easier. I first roughly cut out a circle of about the right size and cut it in half. I then glued it down, and put a bit of card atop on hatch to act as vision block.

Precision craftsmanship at its finest..

This one was only half as difficult...
Given that these are quite world weary kits, I felt that  economy of  effort was justified in getting them up to a useable standard. My priority is to get as many fieldable tanks as possible onto the tabletop, and this current refurbishment reflects this philosophy.

An additional tank has been added to to this batch - a Matchbox Comet. When I was looking for track for Shermans, I discovered a gun from a Comet, so i quickly knocked up a very basic mantlet  out of plastic card, and glued it, and the gun into place.

A very basic mantlet.
I haven't replaced the missing rollers.

Another view.

Side by side with the first comet, which has been sprayed using FOW Late War British Armour.
After the missing bits are added (either pre or post priming), they are getting sprayed with the FOW Late War British Armour spray, and then getting either a black or brown wash. End result: more table ready tanks!

Hong Kong Plastic Trucks.

A box of plastic trucks.
Once upon a time in NZ, it was possible to purchase cheap sets of  20mm plastic soldiers. These sets were often clones of Airfix figures, and were generally manufactured in Hong Kong. Some of these sets came with accessories, and one of the more common accessories was a plastic truck. These were crudely made, lacking a great deal of detail, but they were available cheaply, and in quantity.

Basic model truck. This one has been painted Olive Drab, and had card put in the cab.
Naturally, such a resource would not go ignored by truck hungry Command Decision players. Each truck could be treated as a light truck, and thus carry a ton of supplies (usually ammunition), or a stand of personnel. Suddenly these trucks were valuable, even desirable, and fleets of them were acquired by the players I knew. A quick paint job - grey for Germans, and Olive Drab for the Allies - and some card placed in the cab so the floor could no longer be seen, and these trucks did their duty in numerous games.

Some trucks had more detail. Here is one painted dark grey in axis service.
Eventually these trucks were replaced in service by better models, or larger vehicles, and were consigned to storage boxes. Some time ago I acquired the truck holdings of two CD players, and have embarked on a refurbishment project with them. While not the best example of a WW2 light truck, they are a much better example of trucks made in the postwar period, and they are available in quantity. I am starting with the better detailed vehicles, and will work my way through to the less detailed ones.
A soon to be light flak truck.

The more detailed ones often have etching on their decks to represent planking, and will generally have the outline of a turntable mount on the deck too. With this in mind, I have started the creation of a light flak truck for use in Harad. The gun is a hodgepodge of  parts from the bits back - a broken Hasegawa 37mm flak gun, and the barrel from an Airfix Pak 40 from the "German armoured car that wasn't" kit.
Close up of the AA gun.
Looking at that gun makes me think fondly of CD2, where autocannons got +1 versus personnel stands, rather than CD3's vast range of penalties - which render autocannons ineffective at attacking personnel - but that's a rant for another day.

The first step in the process is to base the vehicle. Then check to see if it needs the cab 'floor' replaced, and then paint. With the better detailed trucks, I won't have to build up out of plastic card the rear chassis for the deck to sit on and for the axles to be connected to. One of the most glaring flaws of the less detailed trucks is the simplistic way they deal with the rear wheel assemblies.

Two of the better trucks. The sand coloured one used to be grey.

I used the dark grey as an undercoat, and painted sand over iot, and then gave it a brown wash.

The finished vehicle.
So while these trucks won't be the best ones on any table, the plan is to bring them up to a suitable standard where I can use them as vehicles for games in Harad. My plan is to also paint some of them up in civilian paint schemes, for use as impressed vehicles, or  even as actual civilian vehicles. Despite their adoption into many CD WW2 armies, I have always felt these trucks had more of  a late 1950s -1960s feel to them. That being said, they are generic enough to pass muster for a wide range of periods, with WW2 being the lower end of the time scale.


Wednesday 25 April 2012

ANZAC DAY.

Unknown Kiwi Soldiers sightseeing in Egypt during WW1.
The photograph was found during restoration work on photographs in the University of Canterbury Students' Association (UCSA) archive during the late 1990s. It had been used as a backing board for another, much later, photograph. This was evidently quite a common practice during the early 1930s. Regardless of the reasons, this photograph was lost from view, and was absent any information when it was rediscovered.  I have always imagined them to have had a connection to the UCSA, an organisation I had spent much time involved with, and thus feel a connection to these unknown soldiers, unknown but not forgotten.

My thoughts often turn to this photo on ANZAC day, for so many reasons, reasons that I have tried so many times to put into words, but none seem to be satisfactory. Today is is day we remember those who serve, those who have served, and those who have fallen, in order to defend our country and our way of life. to them all I say thank you, and that we will remember them.

Sunday 22 April 2012

WIP: Sherman MRL.

Since I finished the Airfix Sherman Crab, I figured I should build the other 'new' Airfix Sherman kit, the Airfix Sherman 'Calliope". Essentially, it is the old Airfix Sherman, with a sprue of new parts containing banks of rocket tubes, and attachment widgets.
Behold, the war comic box art. MRL and bow mg are in use.
 The Sherman goes together well, and if you get on of the more recent kits, you should get the new rubber tracks for your Sherman. Mine had plastic tracks, which were still more flexible than the rigid plastic sets contained in the re-releases of the late 1990s. the Sherman assembles the same way it always has, but the MRL assembly is a little fiddly. The instructions say to drill holes in the turret sides to act as an attachment point for the MRL, but are fairly vague as to exactly where, and the casting of the turret is not the best for this. So I superglued it into place instead using the looks about right method.Naturally, this will mean that the whole assembly is either too far forward, or too far back!

Spray painted with Olive Drab after construction.
 I used the FOW US Army Olive drab spray to paint it, and will paint the tracks, add decals, and give a wash of  Devlan Mud, at a later date. Presumably when I am procrastinating from another project. I am currently trying to organise my Sherman holdings between my WW2 and Modern interests, and within WW2 between, US Army, USMC, and British and Commonwealth forces. Repainting has been easy for the US stuff, just spray olive drab!, but the various in theater paint schemes for the British and Commonwealth forces are a little more complicated, and thus require more research.

Saturday 21 April 2012

The Haradi Guns go Boom, Boom, Boom.....

Right, another posting with a completed project. This time it is the Corgi Diecast guns that I posted about here. I have finished them off and and am quite looking forward to using them against Frank's Noddist horde, or his Khandist rebels.
A useful number of Guns. Perfect for a wide range of fire missions.
Showing the size of the gun to the 1/72 scale figue. I guess the gun is a 1/64 scale model of the Otto Melara Mod 56 105mm Howitizer.
Still a nice looking model.
So that's another couple of additions to Harad finished. I just need to paint some more gun crew, and several battalions of infantry.

Harad Heavy Mortar Carrier.

In 1976, due to the Regent's desire to create an indigenous Defense industry, Harad started work on creating a Haradian designed and built mortar carrier.It was hoped that success with this vehicle could lead to a range of locally produced and designed equipment. In addition to this effort, licenses to locally produce foreign designs were sought, as was foreign involvement in developing Harad's heavy industry.

Or, to put it more simply, I have an Airfix Attack Force "Troop Carrier" that is closer to 1/60 scale than 1/76-1/72 scale as it seems to be some member of the British FV430 series of armoured vehicles - or at least a design inspired by them. I had acquired this vehicle from Glenn many years ago, in order to make use of the tracks, but had no idea of how big it was until i received it. It was slated to become an early model of Nod flame vehicle, but when I remembered that it had a set of nice circular hatches at the back, similar to what I have seen on a number of pictures of  mortar carriers, I decided Harad needed a native armoured vehicle.
Commanders hatches and vision block added with plastic card. Hole in front panel covered over with plastic card.

M-30 107mm Mortar from the Esci M-113 mortar carrier - a much smaller vehicle.
The large gun from the commanders hatch. I look at it and think of the Kafer Thud Gun from 2300AD. Probably because it is huge and chunky.
Once the plastic card additions were made, the vehicle was sprayed grey, and then given a coat of sand. The mortar was then painted and based as well. The vehicle is now ready for action, after I paint up a gun crew for it, and give it some CD stats (which will probably be very similar to that of the M-113, in terms of armour, but with worst mobility)
Locals in awe of the imperial Army's newest acquisition.
Front on. Not a small vehicle.

Rear view. I think it needs some stowage and other stuff on it.

So all that remains is to name Harad's contribution to the world of armoured vehicles. Suggestions are welcomed!

Finished Flakpanzer.

 So here a few pictures to show off the finished Wirbelwind. It was given the usual paint job for my Late War Germans, and seems to blend in quite well.
The rebuild Wibelwind next to a Mobelwagen, and a T-34/76.

Looks ok here, even better at three plus feet....

Just the thing to deal to Jabos! Oh wait... shouldn't that be Fat Herman's job?
Esci T-34/76 kit repainted as a German vehicle. Still have to put on the large national markings to show new ownership.

 And as I go through another box, I discover another Eidai Mk IV hull needing work....
The paint seems thicker on this one, and more of the tools have been hacked off.

Yay! the muffler/exhaust thingy is there - but it's upside down...
I'm hoping to find a suitable subject to rebuild this kit into, as I suspect that it was also a bad conversion of a Brumbar. I'm tempted to make another Mobelwagen if I can find a suitable 37mm gun, but the sides will be interesting to make well. In the mean time a soak in Simple Green will do it some good, or I could use it as a testbed for other methods.