Monday 1 October 2018

T-72 with KMT-7 Mine Rollers

Since my last post I have been spending time on projects other than the siege machines I was working on last post. Part of that was due to my normal process of having several projects on the go - so I can work on something as the mood takes me, and partially due to having dropped the box with them in while moving stuff in the garage and the battering rams requiring minor repair before I proceed to undercoating them. Still these things happen.

I have earlier made the Trumpeter T-55 with KMT-5 Mine Rollers using magnets to attach the rollers to the tank hull, (Click here for details) so it seemed a natural progression to add some mine rollers to a T-72.

The completed beast.
 The base T-72 is a Deagostini die cast that has been given a slight repaint and a heavy brown wash,(Click here for further details on the process) while the mine rollers are a very nice Zedval resin conversion kit that I bodged the assembly of.

The very fine wire supports are missing...
 However, I'm not too concerned as the end product, even with my clumsy corner cutting looks good. In large part this is due to the excellent design of the conversion kit. Like all things excellence costs, and the conversion kit was not cheap! I have some more Zedval conversion kits to assemble, and hopefully they will turn out just as well!

 
More  Soviet engineering goodness!
The other Zedval conversion kits are for what I would describe as being a mine plough attachment set, and a dozer blade attachment. These seem to be the only T-72 engineering conversion kits that I can find - although I'm still hopeful that I will find a conversion kit to make a MTU-72 AVLB from a T-72 hull someday!

Tuesday 6 February 2018

Siege Machines WIP

This weekend I had planned to build more urban terrain for use in modern era games. Instead I was sidetracked by the very nice Zvezda Siege Machine sets that I had been slowly stockpiling over the last couple of years.

A stockpile of siege equipment.
 The models come from the two  Zvezda sets that are reviewed at PSR here and here. Some of these models were included in a couple of the Zvezda Age of Battles games that pitched Russians in a wooden fortress against Mongols with Siege engines. These games included both sets of siege machines, so I have a combination of 3 lots of set 1, and 2 of set 2. I haven't included the cauldron for boiling oil, as intend to include them if I do a post on the collection of castles I have acquired over the years.

Hollywood style catapults.
I have included in all the photos one of the figures included in the games, a Russian knight from the set reviewed here at PSR. This hopefully gives a good sense of how big these machines are - especially the onagers and the ballistae! I have seen some of these models used with 25/28mm figures, so I wonder if they were designed to be compatible with the Zvezda 'Ring of Rule' series of figures.

Ballistae, based on the standard V&B artillery base.
The ballistae come with a choice of ammunition, a large bolt, or a round ball of presumably stone. I still have to decide on what figures to use as crew. Ideally I would be able to have a generic ancients type who could also pass as a medieval figure! So I need figures that could span roughly two thousand years... or I could permanently assign them to a given army/period:)


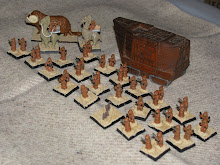
Battering Rams with knight for scale.
Suspending the ram from from the ceiling of the wheeled gallery was not fun. I used wire and harsh language on the first one to achieve an indifferent result. On the other one I used a much smarter approach consisting of two main steps: Step 1, Read and follow the assembly instructions, Step 2, Ask my lovely wife to attach the battering ram using thread. Following those two simple steps made assembly of the second ram a breeze!

I also removed around 25mm off the length of the shaft. While I have been told the length of battering ram shaft of a should be in proportion to the weight of the ram's head so the center of gravity will be in a useful place, the original length looked out of proportion, and was going to make the ram difficult to store. So the reduction was made.

Mantlets, loads of mantlets.
Finally I assembled up eight additional mantlets to go with the three I had previously made. I'm not sure I should base these as not doing so will allow greater flexibility across gaming systems. Still having eleven will provide a useful quantity for any game.

Monday 15 January 2018

WIP Matchbox DAF Pontoon Carrier Trucks

A number of years back, Paul from Plastic Warriors, posted his conversion of the Airfix Thornycroft truck with Coles Crane, into the much more useful for wargaming Thornycroft pontoon truck (Click here to see it)
Matchbox Super King DAF Truck.
Inspired by this, I thought that I could steal the idea and use the Matchbox Super King DAF flatbed truck as the basis for a post war pontoon carrier. After all, bridging assets are always useful, and having a couple of pontoon trucks would make a nice addition to my wargaming 'tail' elements. The pontoons are naturally enough from the Airfix Pontoon kit, or one of the many Hong Kong clones of that set.


If I stack the pontoons this way, I will need to fill in the hollows on the bottom of the pontoons.
The DAF trucks came in a rather 1970s green colour, so I removed as much of the original paint as possible by soaking in a bath of cheap Dettol, followed by using a wire brush head on a Dremel, to remove 85% of the original paint on the first truck. This was followed by an undercoat of grey primer spray paint, followed by a coat of Vallejo Iraqi Sand, and lastly a brown wash. At this point the first truck languished as I hadn't quite decided how to attached the pontoons.

I am considering cutting up some of the pontoon decking to add to the load.


Two years later, I acquired a second truck. This one I disassembled and bunged through the dishwasher with some extra wash tablets for extra paint stripping power. This loosed up a great deal of the paint, and I wire brushed off some more, to result in a good 90% removal of all the original paint. I then spray painted it a sandy/tan/earthy colour and applied a brown wash. This was a much simpler process, and I have been subjecting the majority of Battle and Super Kings I acquire to this process in order to prepare them for repainting.


1/72 Esci/Italeri Figure for scale.

I still have a great deal of work to do before these are complete but I am happy with what progress I have made so far. The final cargo load for both trucks, and the means of securing the load still have to be determined, but I have a couple of ideas I am planning on experimenting with.